No products in the cart.

Last updated on August 16th, 2023
If you want to learn how to make melodies like industry producers, you need to understand some essential practices, tips, and tricks that they use. In this guide, we will break down the melody making process that all industry producers are following from beginning to end. This article will cover everything you need to know, such as:
- How to create unique but effective chord progressions
- How to choose notes and scales that fit the vibe you are going for
- How to create melodies and counter melodies that complement your progressions
- How to avoid common mistakes people make when laying down their melodies
- How to humanize your melodies and make them sound more realistic
Essential Practices
Before you start making your melodies, you need to have a clear idea of what kind of vibe you are going for. This will guide every decision you make, such as choosing a scale, picking presets, adding notes, changing the pitch, and laying down chords. Have you ever seen an episode of ‘The Cave’ with Kenny Beats? There’s a reason why he’s always asking the artist at the beginning what kind of vibe they’re going for.
Another thing you need to remember is that one note gaps, two note gaps, and three note gaps or higher create different moods and emotions in your melodies. One note gaps are used for more dark and evil vibes. Two note gaps are used for more emotional stuff. Finally, three note gaps or higher are used for more anthemic stuff. This is something that every industry producer understands. If you are not that familiar with music scales yet, you can also use MIDI Scale Packs or MIDI Packs in general.
Also, another big mistake that people make is that they start making their melodies on bad presets. When you do that, you’re kind of just shooting yourself in the foot. You want to start with a piano preset most of the times. This is because it’s dry, it’s the most common element in music, it’s easy to hear the mistakes in the notes, and it’s sensitive to note lengths. Note lengths are super important when browsing through presets because they can change the sound of your melody drastically.
Finally, the last thing you want to remember before you start laying anything down is to turn the volume down. The drums are going to be even louder than the melody itself. That’s why you want to leave some headroom to add those elements. If you have to turn them up like crazy to make them stand out, you’re just going to have a lot of clipping in your mix.
Complementing our written guide, Producer FinnaFinesse made an extensive video tutorial showing off all the tricks and secrets you need to know on how to make melodies and chords. He is showcasing the secret sauce professional music producers are using in FL Studio, a widely used and well known digital audio workstation (DAW).
Disclaimer: When clicked, this video loads from YouTube servers. See our privacy policy for details.
Scale Selection
The first thing you need to do is choose a scale that matches the vibe you are going for. The type of scale really isn’t too important, but here’s a little trick that producers use. Like Metro Boomin, Murda Beatz, OG Parker, Wheezy, and many others, they tend to use the E flat/B flat minor scale or any scale that has a lot of black keys in it. The reason for this is that black keys tend to sound more exotic and interesting than white keys. They also make it easier to create melodies because you have less options to choose from. Furthermore, it’s within the octaves most rappers like to rap in. Many DAWs, like FL Studio for example, allow you to use helpers to highlight your desired scale.
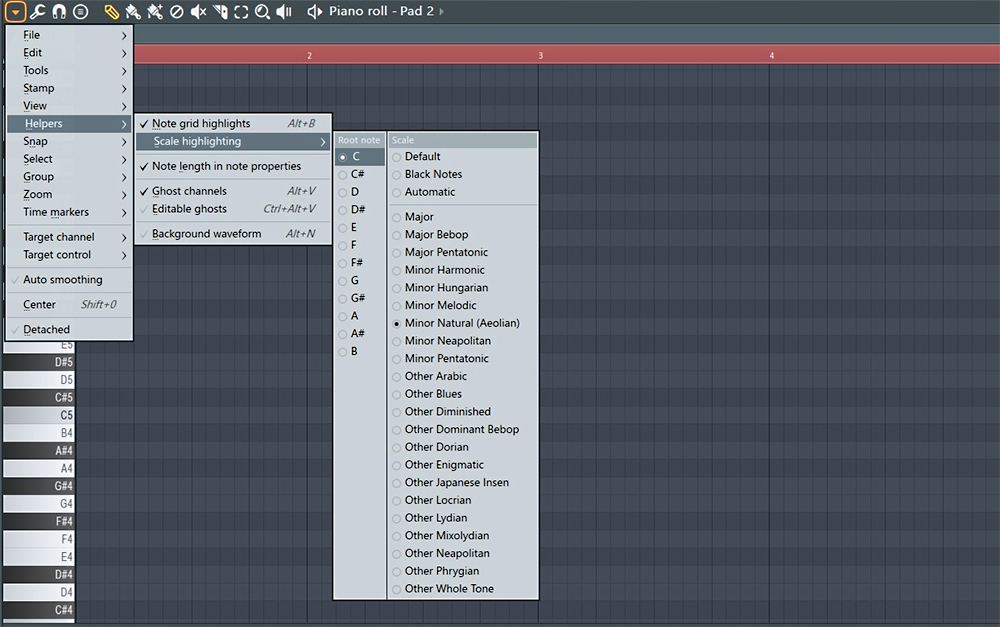
To use this trick, all you need to do is go to your piano roll and highlight all the black keys in your scale. Then, you can use the white keys as passing notes or accents to spice up your melody. You can also transpose your melody up or down by using the arrow keys on your keyboard. This will change the pitch of your melody without changing the notes or the scale.
Chord Progressions
The next step is to create a chord progression that supports your melody. A chord progression is a series of chords that create a harmonic structure for your melody. Chords are made up of multiple notes played at the same time or in sequence. There are many types of chords, such as major chords, minor chords, diminished chords, augmented chords, seventh chords, ninth chords, etc.
Chord codes
To create a chord progression, you need to know how chords are built and how they relate to each other in a scale. A simple way to do this is to use the chord codes method. Chord codes are numbers that represent the intervals between the notes in a chord. For example, a major chord has a chord code of 1-3-5, which means it has a root note (1), a major third (3), and a perfect fifth (5). A minor chord has a chord code of 1-b3-5, which means it has a root note (1), a minor third (b3), and a perfect fifth (5).

To use the chord codes method, all you need to do is choose a root note for your chord. Then count up or down the scale using the chord code numbers. For example, if you want to make an E flat minor chord in the E flat/B flat minor scale, you would start from E flat (1) and then count up three semitones (b3) to get G flat and then count up four semitones (5) to get B flat. Then, you would play these three notes together or in sequence to make your chord.
You can use this method to create any type of chord you want by using different chord codes. You can also add more notes to your chords to make them more complex and interesting, such as seventh notes, ninth notes, eleventh notes, etc. For example, if you want to make an E flat minor seventh chord, you would add a seventh note (b7) to your E flat minor chord by counting up three semitones from B flat. This would give you D flat, which is the seventh note of your chord.
Progressions
To create a chord progression, you need to choose a series of chords that sound good together and fit the vibe you are going for. A simple way to do this is to use the chord progression formula method. Chord progression formulas are numbers that represent the degrees of the scale that you use to build your chords. For example, a common chord progression formula is 1-4-5-1, which means you use the first degree (1), the fourth degree (4), the fifth degree (5), and the first degree (1) of the scale to build your chords.
To use the chord progression formula method, all you need to do is choose a scale and then use the formula numbers to find the root notes of your chords. Then, you can use the chord codes method to build your chords from those root notes. For example, if you want to use the 1-4-5-1 formula in the E flat/B flat minor scale, you would start from E flat (1) and then count up six semitones (4) to get A flat and then count up five semitones (5) to get B flat and then go back to E flat (1). Then, you would use the chord codes method to build your chords from these root notes.
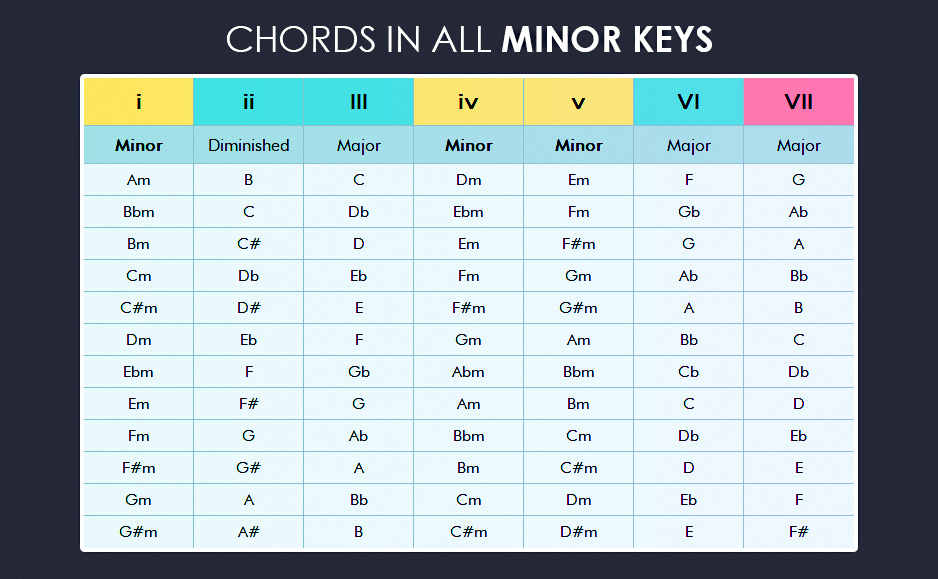
You can use this method to create any type of chord progression you want by using different formulas. You can also change the order, length, and rhythm of your chords to make them more unique and effective. For example, you can invert your chords, which means changing the order of the notes in your chords. You can also split your chords, which means playing some notes before or after the others. You can also add or remove notes from your chords to make them more simple or complex. To make your chords even more interesting, you can also invert them by playing certain notes in a different octave.
Melodies and Counter Melodies
The next step is to create a melody and a counter melody that complement your chord progression. A melody is a series of single notes that create a catchy and memorable tune. A counter melody is a secondary melody that plays along with the main melody and adds more depth and variation to it.
To create a melody and a counter melody, you need to follow some basic rules and tips. These will help you make them sound good. Here are some of them:
- Use notes from the scale that match the vibe you are going for
- Use notes from the chords that support your melody
- Use passing notes and accents to spice up your melody
- Use repetition and variation to make your melody catchy and interesting
- Use different octaves and pitches to create contrast and dynamics in your melody
- Use different rhythms and lengths to create movement and groove in your melody
- Use different instruments and sounds to create texture and color in your melody
To create a melody, you can start by humming or singing a tune that comes to your mind or by playing around with some notes on your keyboard or piano roll. Then, you can refine and polish your melody by following the rules and tips above.
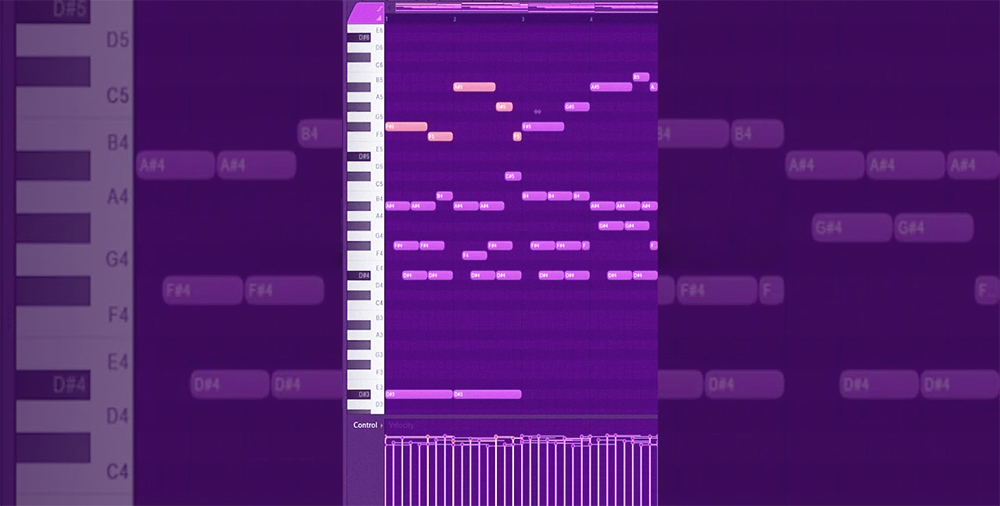
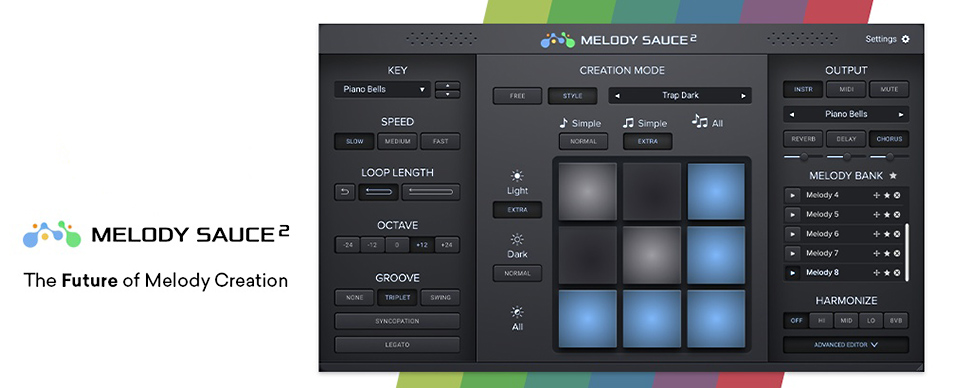
You can also use some tools and techniques that will help you generate or improve your melody, such as:
- Melody generators: These are software or online tools that can generate melodies for you based on some parameters or inputs that you provide. For example, Melody Sauce is a plugin that can generate melodies for any genre or mood.
- Melody analyzers: These are software or online tools that can analyze melodies for you and give you feedback or suggestions on how to improve them. For example, Hookpad is a tool that can show you the chords, scales, rhythms, and harmonies of any melody.
- Melody inspirations: These are sources of inspiration that can help you come up with melodies or ideas for melodies. For example, you can listen to some songs or beats that have melodies that you like or admire and try to learn from them or imitate them.
To create a counter melody, you can follow the same steps as creating a main melody, but with some differences. Here are some of them:
- Use notes from the scale that contrast or complement the main melody
- Use notes from the chords that harmonize or clash with the main melody
- Use passing notes and accents to fill in the gaps or create tension in the main melody
- Use repetition and variation to support or challenge the main melody
Humanizing Your Melodies
The final step is to humanize your melodies and make them sound more realistic and natural. Humanizing your melodies means adding some subtle variations and imperfections to your notes, such as:
-
- Velocity: This is the force or intensity with which you play a note. You can adjust the velocity of your notes by using the velocity editor in your piano roll or by using a MIDI keyboard. You can also use some plugins or tools that can randomize or automate the velocity of your notes.
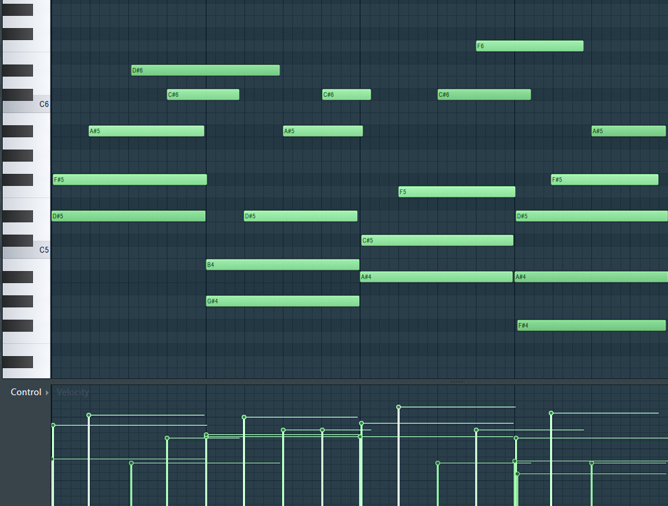
- Timing: This is the position or duration of a note in relation to the tempo or beat. You can adjust the timing of your notes by using the snap or quantize functions in your piano roll or by using a MIDI keyboard. You can also use some plugins or tools that can randomize or automate the timing of your notes. For example, the ‘Groove’ plugin in Ableton can add realistic groove and swing to your MIDI notes.
- Pitch: This is the frequency or tone of a note. You can adjust the pitch of your notes by using the pitch bend or glide functions in your piano roll or by using a MIDI keyboard. You can also use some plugins or tools that can randomize or automate the pitch of your notes. There are also several Pitch plugins who can help with adding realistic pitch variations and modulation to your MIDI notes.
By humanizing your melodies, you can make them sound more expressive and organic, as if they’re played by a real musician. This will also make your melodies more unique and original, as no two humanized melodies will sound exactly the same.
Conclusion
In this guide, we have shown you how to make melodies like industry producers. We’ve covered everything you need to know, such as:
- How to create unique but effective chord progressions
- How to choose notes and scales that fit the vibe you are going for
- How to create melodies and counter melodies that complement your progressions
- How to avoid common mistakes people make when laying down their melodies
- How to humanize your melodies and make them sound more realistic
We really hope that you’ve learned something useful from this article. You can now apply all these tips and tricks to your own melody making process. Remember, practice makes perfect, so keep making melodies and have fun with it.
If you find this article helpful, share it with your friends and leave a comment below. Also, if you want to see more articles like this, make sure to check our Blog posts and follow us on social media. Thank you for reading and happy melody making!
Our posts may contain affiliate links, however, at no cost to you.


